This project demonstrates Pulse Width Modulation (PWM) on Raspberry Pi by controlling the brightness of an LED. PWM is a powerful technique used to obtain variable voltage output from a constant power supply, making it essential for controlling motors, LEDs, and other electronic components. Original Tutorial: Raspberry Pi PWM Tutorial - CircuitDigest
Pulse Width Modulation (PWM) is a method of obtaining variable voltage from a constant power supply by rapidly switching the output ON and OFF. The ratio of ON time to the total period is called the Duty Cycle.
Duty Cycle Formula:
Duty Cycle = Turn ON time / (Turn ON time + Turn OFF time)
For example:
- 50% duty cycle = LED at half brightness
- 0% duty cycle = LED completely OFF
- 100% duty cycle = LED at full brightness
- Raspberry Pi (any model with GPIO pins)
- LED (any color)
- 220Ω or 1KΩ resistor
- Breadboard
- Jumper wires
- MicroSD card with Raspbian OS
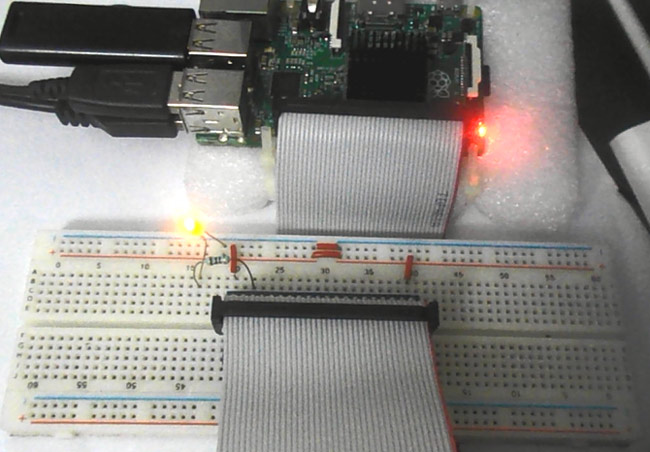
The circuit connects an LED between GPIO19 (PIN35) and Ground (PIN39) with a current-limiting resistor in series.
Connections:
- GPIO19 (PIN35) → Resistor → LED Anode (+)
- LED Cathode (-) → Ground (PIN39)
- GPIO19 (PIN35): PWM output pin
- 220Ω/1KΩ Resistor: Current limiting resistor to protect the LED
- Ground (PIN39): Completes the circuit
- Current Limit: Maximum 15mA can be drawn from any GPIO pin
- Python 3
- RPi.GPIO library (usually pre-installed with Raspbian)
import RPi.GPIO as IO        # Import GPIO library
import time                  # Import time for delays

IO.setwarnings(False)        # Ignore warnings
IO.setmode(IO.BCM)          # Use BCM pin numbering
IO.setup(19, IO.OUT)        # Set GPIO19 as output
p = IO.PWM(19, 100)         # Create PWM object with 100Hz frequency
p.start(0)                  # Start PWM with 0% duty cycle
p.ChangeDutyCycle(50) # Change duty cycle to 50%- Initialize GPIO: Set up GPIO19 as PWM output with 100Hz frequency
- Fade In: Gradually increase duty cycle from 0% to 100% (LED gets brighter)
- Fade Out: Gradually decrease duty cycle from 100% to 0% (LED gets dimmer)
- Repeat: Continue the fade in/out cycle indefinitely
import RPi.GPIO as IO       # Calling header file which helps us use GPIO's of PI
import time                 # Calling time to provide delays in program

IO.setwarnings(False)       # Do not show any warnings
IO.setmode(IO.BCM)         # Programming the GPIO by BCM pin numbers
IO.setup(19, IO.OUT)       # Initialize GPIO19 as an output
p = IO.PWM(19, 100)        # GPIO19 as PWM output, with 100Hz frequency
p.start(0)                 # Generate PWM signal with 0% duty cycle

while True:                 # Execute loop forever
    # Fade In - Increase brightness
    for x in range(50):     # Execute loop 50 times, x incremented from 0 to 49
        p.ChangeDutyCycle(x*2)  # Change duty cycle (0% to 98%)
        time.sleep(0.1)     # Sleep for 100ms

    # Fade Out - Decrease brightness
    for x in range(50):     # Execute loop 50 times, x incremented from 0 to 49
        p.ChangeDutyCycle(100-x*2)  # Change duty cycle (100% to 2%)
time.sleep(0.1) # Sleep for 100ms- Setup Hardware: Connect the circuit as shown in the diagram
- Save Code: Save the Python code as
pwm_led.py - Run Program: Execute the following command in terminal:
python3 pwm_led.py
- Observe: Watch the LED fade in and out continuously
- Stop Program: Press
Ctrl+Cto stop the program
- LED will gradually fade in (get brighter) over 5 seconds
- LED will gradually fade out (get dimmer) over 5 seconds
- This cycle will repeat continuously
- The human eye perceives smooth brightness transitions due to the 100Hz PWM frequency
This PWM technique can be extended to:
- Motor Speed Control: Control DC motor speed
- Servo Control: Position control of servo motors
- Audio: Generate audio tones and sound effects
- RGB LEDs: Create color mixing effects
- Heating Elements: Temperature control
- Fan Speed Control: Variable speed control
Common Issues:
- LED not working: Check connections and ensure LED polarity is correct
- Permission denied: Run script with
sudo python3 pwm_led.py - GPIO already in use: Restart Raspberry Pi or use different GPIO pin
- Flickering LED: Increase PWM frequency in code
- Hardware PWM: Raspberry Pi has only one hardware PWM pin (GPIO18)
- Software PWM: This tutorial uses software PWM which is more flexible
- Frequency: 100Hz is chosen to avoid visible flickering
- Duty Cycle Range: 0-100% provides full brightness control
- Current Safety: Always use current-limiting resistors with LEDs
After completing this project, you will understand:
- PWM signal generation principles
- GPIO pin configuration and control
- Duty cycle and frequency relationships
- Python programming for hardware control
- Circuit design with current limiting
- Try different PWM frequencies and observe the effects
- Control multiple LEDs with different GPIO pins
- Implement RGB color mixing with three LEDs
- Add potentiometer control for manual brightness adjustment
- Explore hardware PWM vs software PWM differences
Raspberry Pi Projects : (https://circuitdigest.com/microcontroller-projects/raspberry-pi-pwm-tutorial](https://circuitdigest.com/simple-raspberry-pi-projects-for-beginners) Raspberry Pi Zero Projects :(https://circuitdigest.com/raspberry-pi-zero-projects-and-tutorials) Raspberry Pi Pico Projects and Tutorials :(https://circuitdigest.com/raspberry-pi-pico-projects-and-tutorials)
Project Difficulty: Beginner
Estimated Time: 30-45 minutes
Skills: Basic Python, Electronics, GPIO Programming