Captured: 2016-01-19 at 11:51 from www.pyimagesearch.com
I'll keep the introduction to today's post short, since I think the title of this post and GIF animation above speak for themselves.
Inside this post, I'll demonstrate how to attach multiple cameras to your Raspberry Pi…and access all of them using a single Python script.
Regardless if your setup includes:
- Multiple USB webcams.
- Or the Raspberry Pi camera module + additional USB cameras…
…the code detailed in this post will allow you to access all of your video streams -- and perform motion detection on each of them!
Best of all, our implementation of multiple camera access with the Raspberry Pi and OpenCV is capable of running in real-time (or near real-time, depending on the number of cameras you have attached), making it perfect for creating your own multi-camera home surveillance system.
Keep reading to learn more.
Multiple cameras with the Raspberry Pi and OpenCV
When building a Raspberry Pi setup to leverage multiple cameras, you have two options:
- Simply use multiple USB web cams.
- Or use one Raspberry Pi camera module and at least one USB web camera.
The Raspberry Pi board has only one camera port, so you will not be able to use multiple Raspberry Pi camera boards (unless you want to perform some extensive hacks to your Pi). So in order to attach multiple cameras to your Pi, you'll need to leverage at least one (if not more) USB cameras.
That said, in order to build my own multi-camera Raspberry Pi setup, I ended up using:
You can see an example of my setup below:
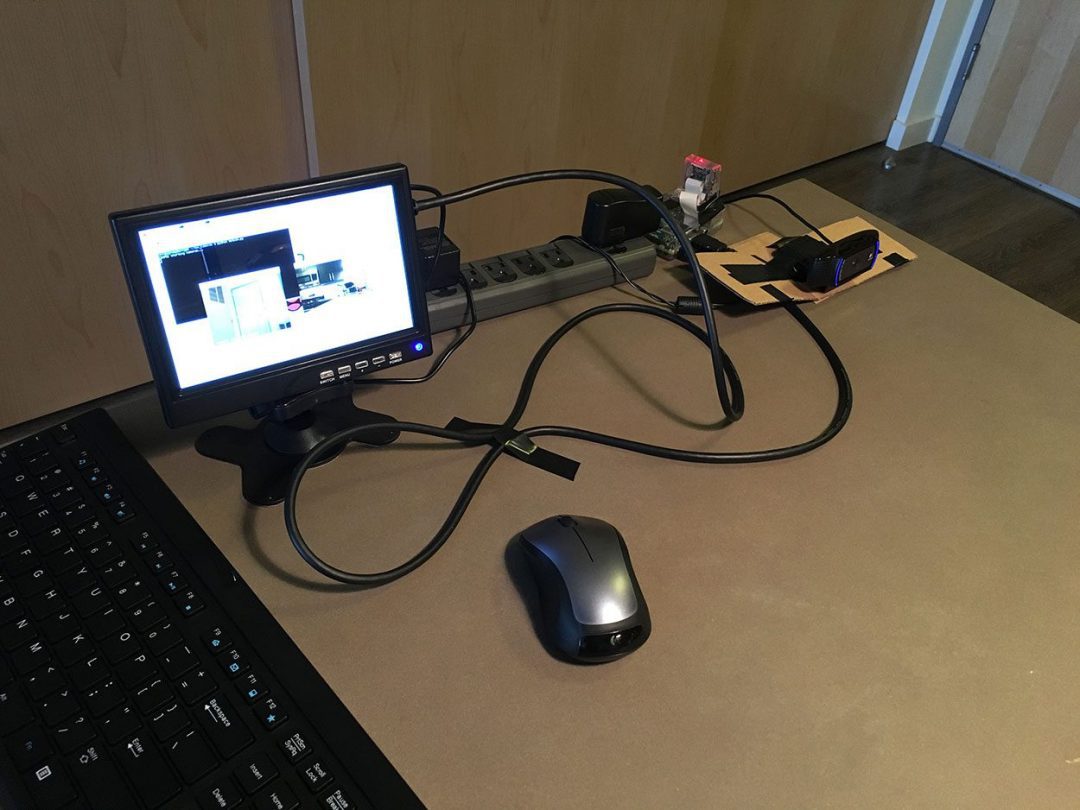
Figure 1: My multiple camera Raspberry Pi setup.
Here we can see my Raspberry Pi 2, along with the Raspberry Pi camera module (sitting on top of the Pi 2) and my Logitech C920 webcam.
The Raspberry Pi camera module is pointing towards my apartment door to monitor anyone that is entering and leaving, while the USB webcam is pointed towards the kitchen, observing any activity that may be going on:
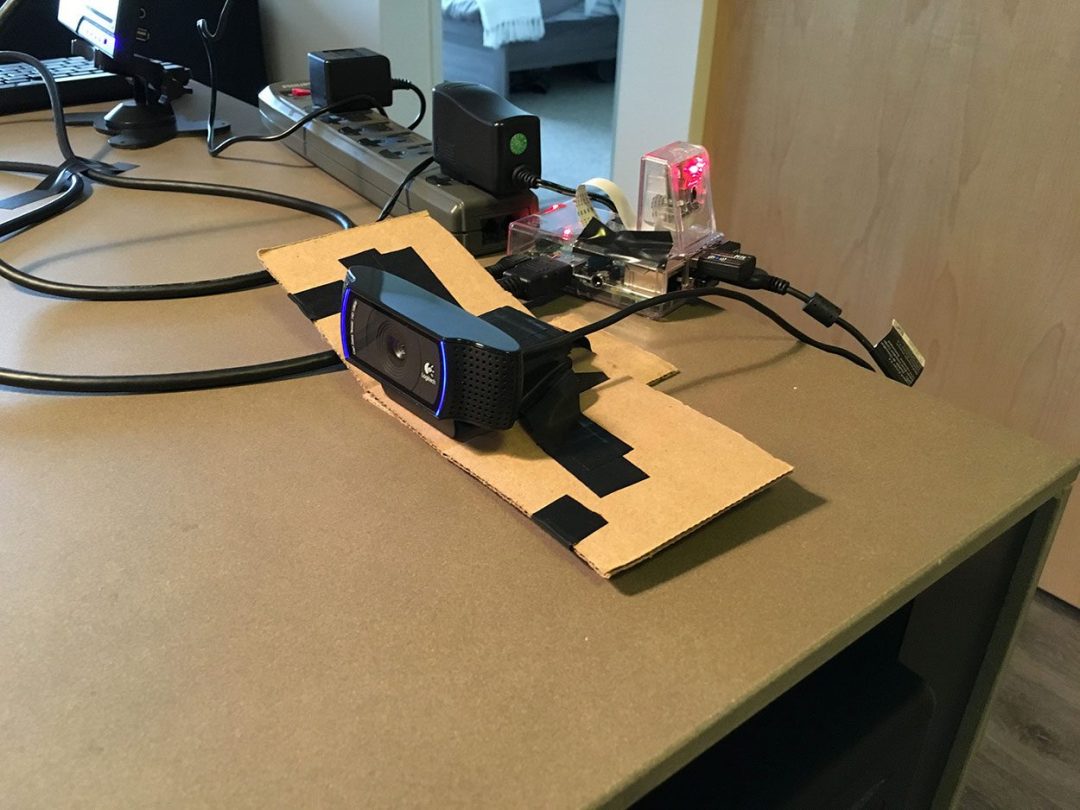
Figure 2: The Raspberry Pi camera module and USB camera are both hooked up to my Raspberry Pi, but are monitoring different areas of the room.
Ignore the electrical tape and cardboard on the USB camera -- this was from a previous experiment which should (hopefully) be published on the PyImageSearch blog soon.
Finally, you can see an example of both video feeds displayed to my Raspberry Pi in the image below:

Figure 3: An example screenshot of monitoring both video feeds from the multiple camera Raspberry Pi setup.
In the remainder of this blog post, we'll define a simple motion detection class that can detect if a person/object is moving in the field of view of a given camera. We'll then write a Python driver script that instantiates our two video streams and performs motion detection in both of them.
As we'll see, by using the threaded video stream capture classes (where one thread per camera is dedicated to perform I/O operations, allowing the main program thread to continue unblocked), we can easily get our motion detectors for multiple cameras to run in real-time on the Raspberry Pi 2.
Let's go ahead and get started by defining the simple motion detector class.
In this section, we'll build a simple Python class that can be used to detect motion in a field of view of a given camera.
For efficiency, this class will assume there is only one object moving in the camera view at a time -- in future blog posts, we'll look at more advanced motion detection and background subtraction methods to track multiple objects.
In fact, we have already (partially) reviewed this motion detection method in our previous lesson, home surveillance and motion detection with the Raspberry Pi, Python, OpenCV, and Dropbox -- we are now formalizing this implementation into a reusable class rather than just inline code.
Let's get started by opening a new file, naming it basicmotiondetector.py , and adding in the following code:
1234567891011121314151617
import the necessary packagesimportimutilsimportcv2classBasicMotionDetector:def__init__(self,accumWeight=0.5,deltaThresh=5,minArea=5000):# determine the OpenCV version, followed by storing the# the frame accumulation weight, the fixed threshold for# the delta image, and finally the minimum area required# for "motion" to be reportedself.isv2=imutils.is_cv2()self.accumWeight=accumWeightself.deltaThresh=deltaThreshself.minArea=minArea# initialize the average image for motion detectionself.avg=None
Line 6 defines the constructor to our BasicMotionDetector class. The constructor accepts three optional keyword arguments, which include:
- accumWeight : The floating point value used for the taking the weighted average between the current frame and the previous set of frames. A larger accumWeight will result in the background model having less "memory" and quickly "forgetting" what previous frames looked like. Using a high value of accumWeight is useful if you except lots of motion in a short amount of time. Conversely, smaller values of accumWeight give more weight to the background model than the current frame, allowing you to detect larger changes in the foreground. We'll use a default value of 0.5 in this example, just keep in mind that this is a tunable parameter that you should consider working with.
- deltaThresh : After computing the difference between the current frame and the background model, we'll need to apply thresholding to find regions in a frame that contain motion -- this deltaThresh value is used for the thresholding. Smaller values of deltaThresh will detect more motion, while larger values will detect less motion.
- minArea : After applying thresholding, we'll be left with a binary image that we extract contours from. In order to handle noise and ignore small regions of motion, we can use the minArea parameter. Any region with >minArea is labeled as "motion"; otherwise, it is ignored.
Finally, Line 17 initializes avg , which is simply the running, weighted average of the previous frames the BasicMotionDetector has seen.
Let's move on to our update method:
192021222324252627282930313233 defupdate(self,image):# initialize the list of locations containing motionlocs=[]# if the average image is None, initialize itifself.avg isNone:self.avg=image.astype("float")returnlocs# otherwise, accumulate the weighted average between# the current frame and the previous frames, then compute# the pixel-wise differences between the current frame# and running averagecv2.accumulateWeighted(image,self.avg,self.accumWeight)frameDelta=cv2.absdiff(image,cv2.convertScaleAbs(self.avg)
The update function requires a single parameter -- the image we want to detect motion in.
Line 21 initializes locs , the list of contours that correspond to motion locations in the image. However, if the avg has not been initialized (Lines 24-26), we set avg to the current frame and return from the method.
Otherwise, the avg has already been initialized so we accumulate the running, weighted average between the previous frames and the current frames, using the accumWeight value supplied to the constructor (Line 32). Taking the absolute value difference between the current frame and the running average yields regions of the image that contain motion -- we call this our delta image.
However, in order to actually detect regions in our delta image that contain motion, we first need to apply thresholding and contour detection:
353637383940414243444546474849505152535455
threshold the delta image and apply a series of dilations# to help fill in holesthresh=cv2.threshold(frameDelta,self.deltaThresh,255,cv2.THRESH_BINARY)[1]thresh=cv2.dilate(thresh,None,iterations=2)# find contours in the thresholded image, taking care to# use the appropriate version of OpenCVcnts=cv2.findContours(thresh,cv2.RETR_EXTERNAL,cv2.CHAIN_APPROX_SIMPLE)cnts=cnts[0]ifself.isv2 elsecnts[1]# loop over the contoursforcincnts:# only add the contour to the locations list if it# exceeds the minimum areaifcv2.contourArea(c)>self.minArea:locs.append(c)# return the set of locationsreturnlocs
Calling cv2.threshold using the supplied value of deltaThresh allows us to binarize the delta image, which we then find contours in (Lines 37-45).
_Note:_Take special care when examining Lines 43-45. As we know, the cv2.findContours method return signature changed between OpenCV 2.4 and 3. This codeblock allows us to use cv2.findContours in both OpenCV 2.4 and 3 without having to change a line of code (or worry about versioning issues).
Finally, Lines 48-52 loop over the detected contours, check to see if their area is greater than the supplied minArea , and if so, updates the locs list.
The list of contours containing motion are then returned to calling method on Line 55.
**Note: **Again, for a more detailed review of the motion detection algorithm, please see the home surveillance tutorial.
Now that our BasicMotionDetector class has been defined, we are now ready to create the multi_cam_motion.py driver script to access the multiple cameras with the Raspberry Pi -- and apply motion detection to each of the video streams.
Let's go ahead and get started defining our driver script:
123456789101112131415161718192021
# import the necessary packagesfrom__future__importprint_functionfrompyimagesearch.basicmotiondetector importBasicMotionDetectorfromimutils.video importVideoStreamimportnumpy asnpimportdatetimeimportimutilsimporttimeimportcv2# initialize the video streams and allow them to warmupprint("[INFO] starting cameras...")webcam=VideoStream(src=0).start()picam=VideoStream(usePiCamera=True).start()time.sleep(2.0)# initialize the two motion detectors, along with the total# number of frames readcamMotion=BasicMotionDetector()piMotion=BasicMotionDetector()total=0

We start off on **Lines 2-9** by importing our required Python packages. Notice how we have placed the BasicMotionDetector class inside the pyimagesearch module for organizational purposes. We also import VideoStream , our threaded video stream class that is capable of accessing _both_ the Raspberry Pi camera module and built-in/USB web cameras.

The VideoStream class is part of the [imutils package](https://github.com/jrosebr1/imutils), so if you do not already have it installed, just execute the following command:

**Line 13 **initializes our _**USB webcam**_ VideoStream class while **Line 14** initializes our _**Raspberry Pi camera module**_ VideoStream class (by specifying usePiCamera=True ).

In the case that you _do not_ want to use the Raspberry Pi camera module and instead want to leverage two USB cameras, simply changes **Lines 13 and 14 **to:

Where the src parameter controls the index of the camera on your machine. Also note that you'll have to replace webcam and picam with webcam1 and webcam2 , respectively throughout the rest of this script as well.

Finally, **Lines 19 and 20** instantiate two BasicMotionDetector 's, one for the USB camera and a second for the Raspberry Pi camera module.

We are now ready to perform motion detection in both video feeds:

2324252627282930313233343536373839404142434445
# loop over frames from the video streamswhileTrue:# initialize the list of frames that have been processedframes=[]# loop over the frames and their respective motion detectorsfor(stream,motion)inzip((webcam,picam),(camMotion,piMotion)):# read the next frame from the video stream and resize# it to have a maximum width of 400 pixelsframe=stream.read()frame=imutils.resize(frame,width=400)# convert the frame to grayscale, blur it slightly, update# the motion detectorgray=cv2.cvtColor(frame,cv2.COLOR_BGR2GRAY)gray=cv2.GaussianBlur(gray,(21,21),0)locs=motion.update(gray)# we should allow the motion detector to "run" for a bit# and accumulate a set of frames to form a nice averageiftotal<32:frames.append(frame)continue

On **Line 24** we start an infinite loop that is used to constantly poll frames from our (two) camera sensors. We initialize a list of such frames on **Line 26**.

Then, **Line 29** defines a for loop that loops over each of the video stream and motion detectors, respectively. We use the stream to read a frame from our camera sensor and then resize the frame to have a fixed width of 400 pixels.

Further pre-processing is performed on **Lines 37 and 38** by converting the frame to grayscale and applying a Gaussian smoothing operation to reduce high frequency noise. Finally, the processed frame is passed to our motion detector where the actual motion detection is performed (**Line 39**).

However, it's important to let our motion detector "run" for a bit so that it can obtain an accurate running average of what our background "looks like". We'll allow 32 frames to be used in the average background computation _before_ applying any motion detection (**Lines 43-45**).

After we have allowed 32 frames to be passed into our BasicMotionDetector's, we can check to see if any motion was detected:

4748495051525354555657585960616263646566
# otherwise, check to see if motion was detectediflen(locs)>0:# initialize the minimum and maximum (x, y)-coordinates,# respectively(minX,minY)=(np.inf,np.inf)(maxX,maxY)=(-np.inf,-np.inf)# loop over the locations of motion and accumulate the# minimum and maximum locations of the bounding boxesforlinlocs:(x,y,w,h)=cv2.boundingRect(l)(minX,maxX)=(min(minX,x),max(maxX,x+w))(minY,maxY)=(min(minY,y),max(maxY,y+h))# draw the bounding boxcv2.rectangle(frame,(minX,minY),(maxX,maxY),(0,0,255),3)# update the frames listframes.append(frame)

**Line 48** checks to see if motion was detected in the frame of the current video stream .

Provided that motion was detected, we initialize the minimum and maximum _(x, y)_-coordinates associated with the contours (i.e., locs ). We then loop over the contours individually and use them to determine the smallest bounding box that encompasses _all_ contours (**Lines 51-59**).

The bounding box is then drawn surrounding the motion region on **Lines 62 and 63**, followed by our list of frames updated on **Line 66**.

Again, the code detailed in this blog post assumes that there is only _one_ object/person moving at a time in the given frame, hence this approach will obtain the desired result. However, if there are _multiple_ moving objects, then we'll need to use more advanced background subtraction and tracking methods -- future blog posts on PyImageSearch will cover how to perform multi-object tracking.

The last step is to display our frames to our screen:

68697071727374757677787980818283848586878889909192
# increment the total number of frames read and grab the # current timestamptotal+=1timestamp=datetime.datetime.now()ts=timestamp.strftime("%A %d %B %Y %I:%M:%S%p")# loop over the frames a second timefor(frame,name)inzip(frames,("Webcam","Picamera")):# draw the timestamp on the frame and display itcv2.putText(frame,ts,(10,frame.shape[0]-10),cv2.FONT_HERSHEY_SIMPLEX,0.35,(0,0,255),1)cv2.imshow(name,frame)# check to see if a key was pressedkey=cv2.waitKey(1)&0xFF# if the `q` key was pressed, break from the loopifkey==ord("q"):break# do a bit of cleanupprint("[INFO] cleaning up...")cv2.destroyAllWindows()webcam.stop()picam.stop()
Liens 70-72 increments the total number of frames processed, followed by grabbing and formatting the current timestamp.
We then loop over each of the frames we have processed for motion on Line 75 and display them to our screen.
Finally, Lines 82-86 check to see if the q key is pressed, indicating that we should break from the frame reading loop. Lines 89-92 then perform a bit of cleanup.
To see our multiple camera motion detector run on the Raspberry Pi, just execute the following command:
I have included a series of "highlight frames" in the following GIF that demonstrate our multi-camera motion detector in action:
Figure 4: An example of applying motion detection to multiple cameras using the Raspberry Pi, OpenCV, and Python.
Notice how I start in the kitchen, open a cabinet, reach for a mug, and head to the sink to fill the mug up with water -- this series of actions and motion are detected on the first camera.
Finally, I head to the trash can to throw out a paper towel before exiting the frame view of the second camera.
A full video demo of multiple camera access using the Raspberry Pi can be seen below:
In this blog post, we learned how to access multiple cameras using the Raspberry Pi 2, OpenCV, and Python.
When accessing multiple cameras on the Raspberry Pi, you have two choices when constructing your setup:
- Either use multiple USB webcams.
- Or using a single Raspberry Pi camera module and at least one USB webcam.
Since the Raspberry Pi board has only one camera input, you cannot leverage multiple Pi camera boards -- atleast without extensive hacks to your Pi.
In order to provide an interesting implementation of multiple camera access with the Raspberry Pi, we created a simple motion detection class that can be used to detect motion in the frame views of each camera connected to the Pi.
While basic, this motion detector demonstrated that multiple camera access is capable of being executed in real-time on the Raspberry Pi -- especially with the help of our threaded PiVideoStream and VideoStream classes implemented in blog posts a few weeks ago.
If you are interested in learning more about using the Raspberry Pi for computer vision, along with other tips, tricks, and hacks related to OpenCV, be sure to signup for the PyImageSearch Newsletter using the form at the bottom of this post.
See you next week!