Captured: 2016-11-07 at 10:57 from www.chalk-elec.com
You will need:
1. LCD panel
2. LVDS cable with attached miniUSB connector (for touch controller) and ambient light sensor
3. HDMI-LVDS converter
4. miniUSB cable - optionally available during order
5. Power adapter (5V, at least 2A) - optionally available during order

All above you will receive with our LCD bundle order.
Also, you will need additionally:
6. SD card
7. microUSB cable to power RasPi
8. RaspberryPi board itself

Here are the steps to get LCD working:
1. Download latest image of Raspbian from www.raspbian.org or www.raspberrypi.org. I used version "2012-09-18-wheezy-raspbian" for demo.
2. Create SD card based on this image.
3. - if you have 10″ LG panel and your HDMI board has U5 chip installed, then skip to p.4
- if you have 7″ CPT panel with resistive touchscreen, then download this config.txt file and put it to the root of boot partition of SD card
- if you have old HDMI board and 10″ LG panel, then open file called "config.txt" on just created SD card and add single line at the top: "hdmi_edid_file=1″, then download file edid.dat and copy it to the root of boot partition of SD card
- if you have your own LCD, then you should create binary EDID file (full file name edid.dat) yourself following datasheet of your LCD and copy this "edid.dat" file to the root of boot partition of SD card
4. Connect LVDS cable to LCD as on below photos. Cable connector should be fully inserted into mate connector on backside of LCD.
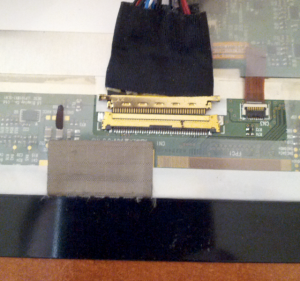

5. Connect LVDS cable to HDMI-LVDS board as on below photo. Pin 1 of cable is marked with white dot.
6. Connect microUSB cable from HDMI-LVDS board to RasPi microUSB connector.

7. Connect miniUSB cable between RasPi USB port and small red board that is part of LVDS cable.

8. Connect cable of power adapter to HDMI-LVDS board.

9. Turn on power, this will start your RaspberryPi and you should get image on screen immediately. During first run Raspbian will run configuration utility. Touchscreen is not working at yet, and you will need usual USB keyboard to enable option "Start desktop on boot".

10. After RasPi will restart to GUI, you will be able to use touchscreen as a mouse.

Final SD card image for 10″ LCD (at least 4Gb card) is here: SD card test image
We use this SD card image to test our bundles before shipping.
Some of our first customers (who placed order in September) can encounter problems with LCD backlight. If you see that backlight is not turned on when you apply power to our HDMI-LVDS board (screen is completely black, no light from the side view of LCD), then you has 2 ways to improve this:
1. Short pins 1 and 3 on white 6-pins connector (CON4). Pin 1 has square shape, others pins have round shape. Don't worry if you short pin 2 as well - it is not connected anywhere.
or
2. Short pins 1,2,3 on PIC microcontroller (U3). Pin 1 is marked with white dot. Don't worry if you short pin 4 as well - it anyway tied up to power.

UPDATE: here is interesting post from one of our customers about his experience with connection of our 10″ LCD Raspberry Kiosk