If you wish to configure your app to use different Branch environments for different builds, you can use custom build configurations in Xcode and build types or product flavors with Gradle. For example, you may want to use the test environment for debug builds and the live environment for release builds. Or you may choose to use a different criterion. Everything described here is a matter of one-time project setup. Afterward, whenever you do a build of a particular kind, it will automatically use the correct Branch key.
All changes must be made in the native app projects. There is currently no support for doing this from JavaScript.
-
Obtain your Branch live and test keys from the Branch Dashboard:
See the Account Settings page in the Branch Dashboard to find your Branch live and test keys. Select "Live" or "Test" at the upper left to switch keys.
-
Perform basic integration of the react-native-branch SDK in your app.
First, you must define both the live and test keys within your Android and iOS projects. Once this is done, you'll specify when to use each key.
Add both keys to the AndroidManifest.xml within the <application> tag:
<manifest xmlns:android="http://schemas.android.com/apk/res/android"
    package="io.branch.sample"
    android:versionCode="1"
    android:versionName="1.0" >

    <uses-permission android:name="android.permission.INTERNET" />

    <application>
        <!-- Other existing entries -->

        <!-- Branch live and test keys -->
        <meta-data android:name="io.branch.sdk.BranchKey" android:value="key_live_xxxxxxx" />
        <meta-data android:name="io.branch.sdk.BranchKey.test" android:value="key_test_yyyyyyy" />
    </application>
</manifest>In the Info.plist for your project, make the branch_key a dictionary instead of a string, and add entries for keys "live" and "test" with string values. Add your keys from the Branch Dashboard as the values of the corresponding keys.

Simply add the following file to your Android project as android/app/src/debug/AndroidManifest.xml:
<manifest xmlns:android="http://schemas.android.com/apk/res/android"
  package="com.example.mypackage">
   <application>
       <meta-data android:name="io.branch.sdk.TestMode" android:value="true" /> <!-- Set to true to use Branch_Test_Key -->
   </application>
</manifest>
Replace com.example.mypackage with the package name from your main AndroidManifest.xml.
By default, the Branch SDK uses the live key. If you prefer, you can add a similar file with android:value="false" as android/app/src/release/AndroidManifest.xml, but this
is not necessary.
Gradle automatically merges the main manifest with the manifest for each build type and product flavor.
In your AppDelegate.m or AppDelegate.swift source file,
add a conditional call to [RNBranch useTestInstance] (Obj-C) or RNBranch.useTestInstance() (Swift) before calling initSession.
Obj-C
#ifdef DEBUG
    [RNBranch useTestInstance];
#endif

    [RNBranch initSessionWithLaunchOptions:launchOptions isReferrable:YES];
Swift
#if DEBUG
    RNBranch.useTestInstance()
#endif

RNBranch.initSession(launchOptions: launchOptions, isReferrable: true)If you want to use different criteria to determine when to use each key, you need to do a little more setup. For example, you want to build different versions of the app that point to different versions of your application API, such as production and staging, and you want to select the Branch key based on this
Define custom productFlavors for your app in the android/app/build.gradle file:
android {
    ...
    defaultConfig { ... }
    buildTypes { ... }
    productFlavors {
        stage {
            applicationIdSuffix ".stage"
            versionNameSuffix "-stage"
        }
    }
}
Now add the following file as android/app/src/<productFlavor>/AndroidManifest.xml for each flavor
that uses the test key, e.g. android/app/src/stage/AndroidManifest.xml:
<manifest xmlns:android="http://schemas.android.com/apk/res/android"
  package="com.example.mypackage">
   <application>
       <meta-data android:name="io.branch.sdk.TestMode" android:value="true" /> <!-- Set to true to use Branch_Test_Key -->
   </application>
</manifest>
Replace com.example.mypackage with the package name from your main AndroidManifest.xml.
By default (for the main product flavor), the Branch SDK uses the live key.
You can also specify settings for combinations of build type and product flavor, e.g. in
android/app/src/stageDebug/AndroidManifest.xml or android/app/src/stageRelease/AndroidManifest.xml.
See the Android documentation for more details on configuring Android build variants.
React Native does not directly support custom build configurations automatically
when using react-native link to build your app. Supporting this in your React
Native app requires either manual modification of the Xcode projects installed
in node_modules or custom automation to update them properly each time you update
your NPM dependencies. This process is not documented here or currently
supported by this SDK.
If instead you are using the React, react-native-branch and Branch-SDK pods in your Podfile to integrate the SDK, you can add custom build configurations to your projects.
The following instructions show how to add a new configuration and scheme to your app that can be used to connect to the Branch test environment.
By default, all Xcode projects include Debug and Release configurations. Define a new configuration called Test-Debug by copying the existing Debug configuration.
On the Info tab of the Project settings, click the + button under the list of Configurations. Select Duplicate "Debug" Configuration.
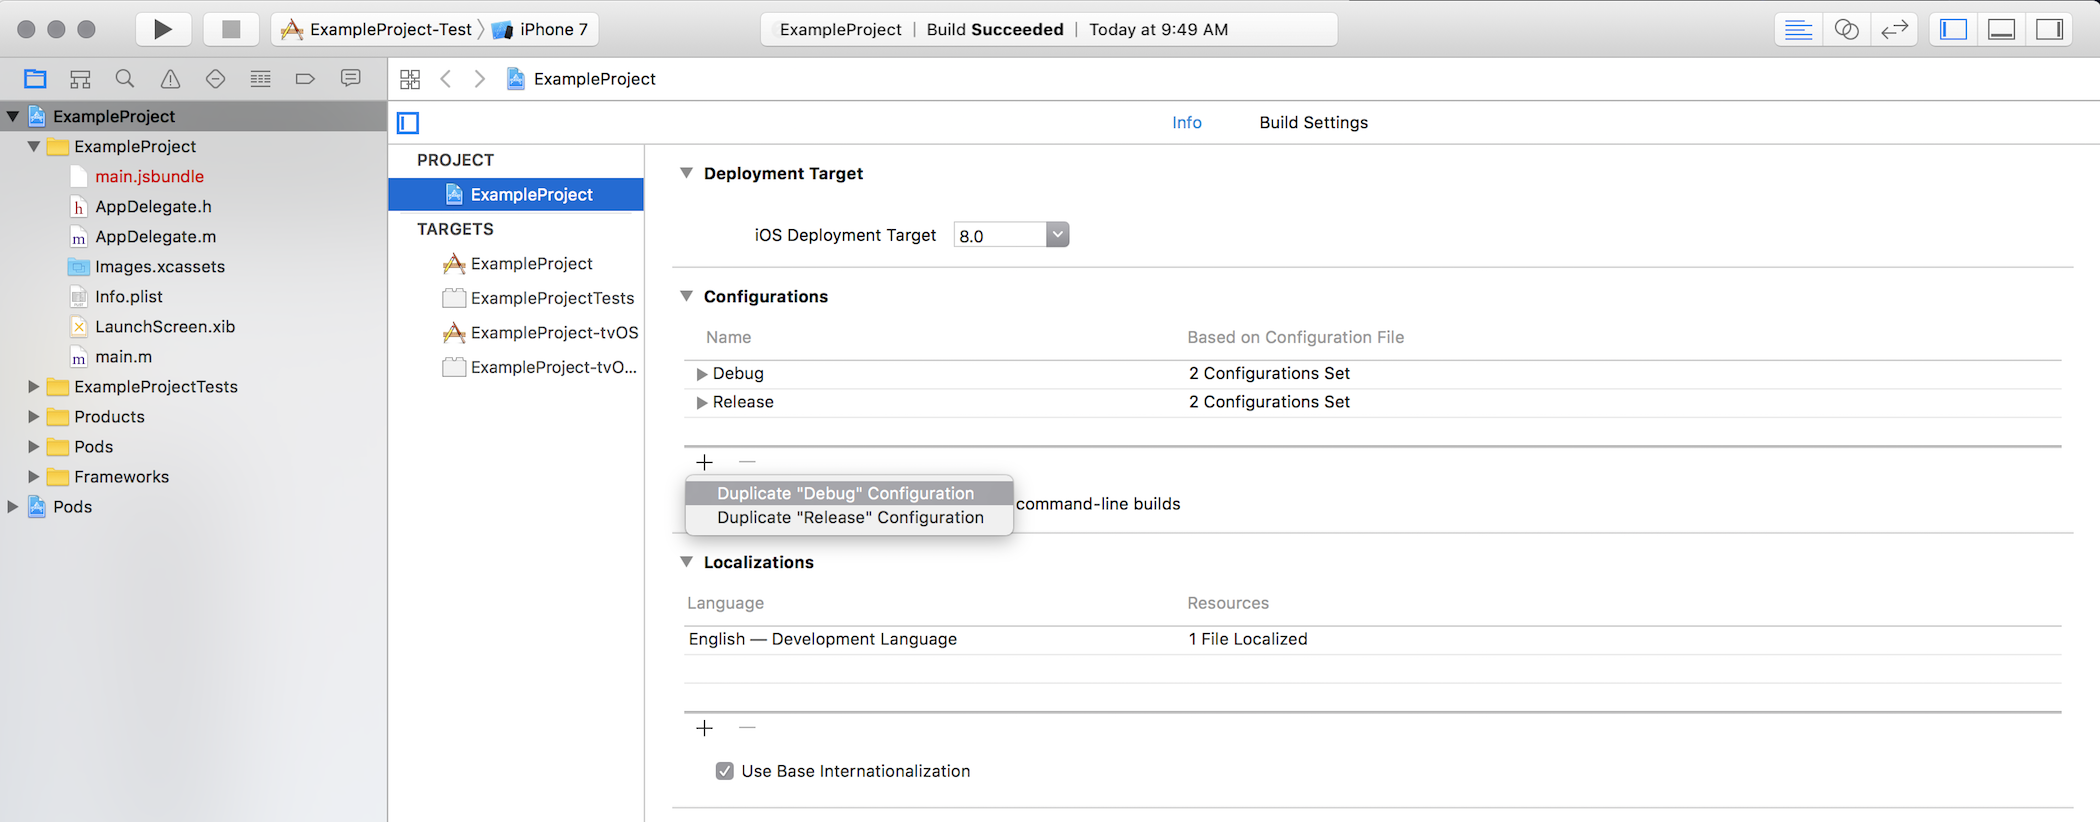
Name the new configuration Test-Debug.

From the Xcode task bar, select Product > Scheme > New Scheme....
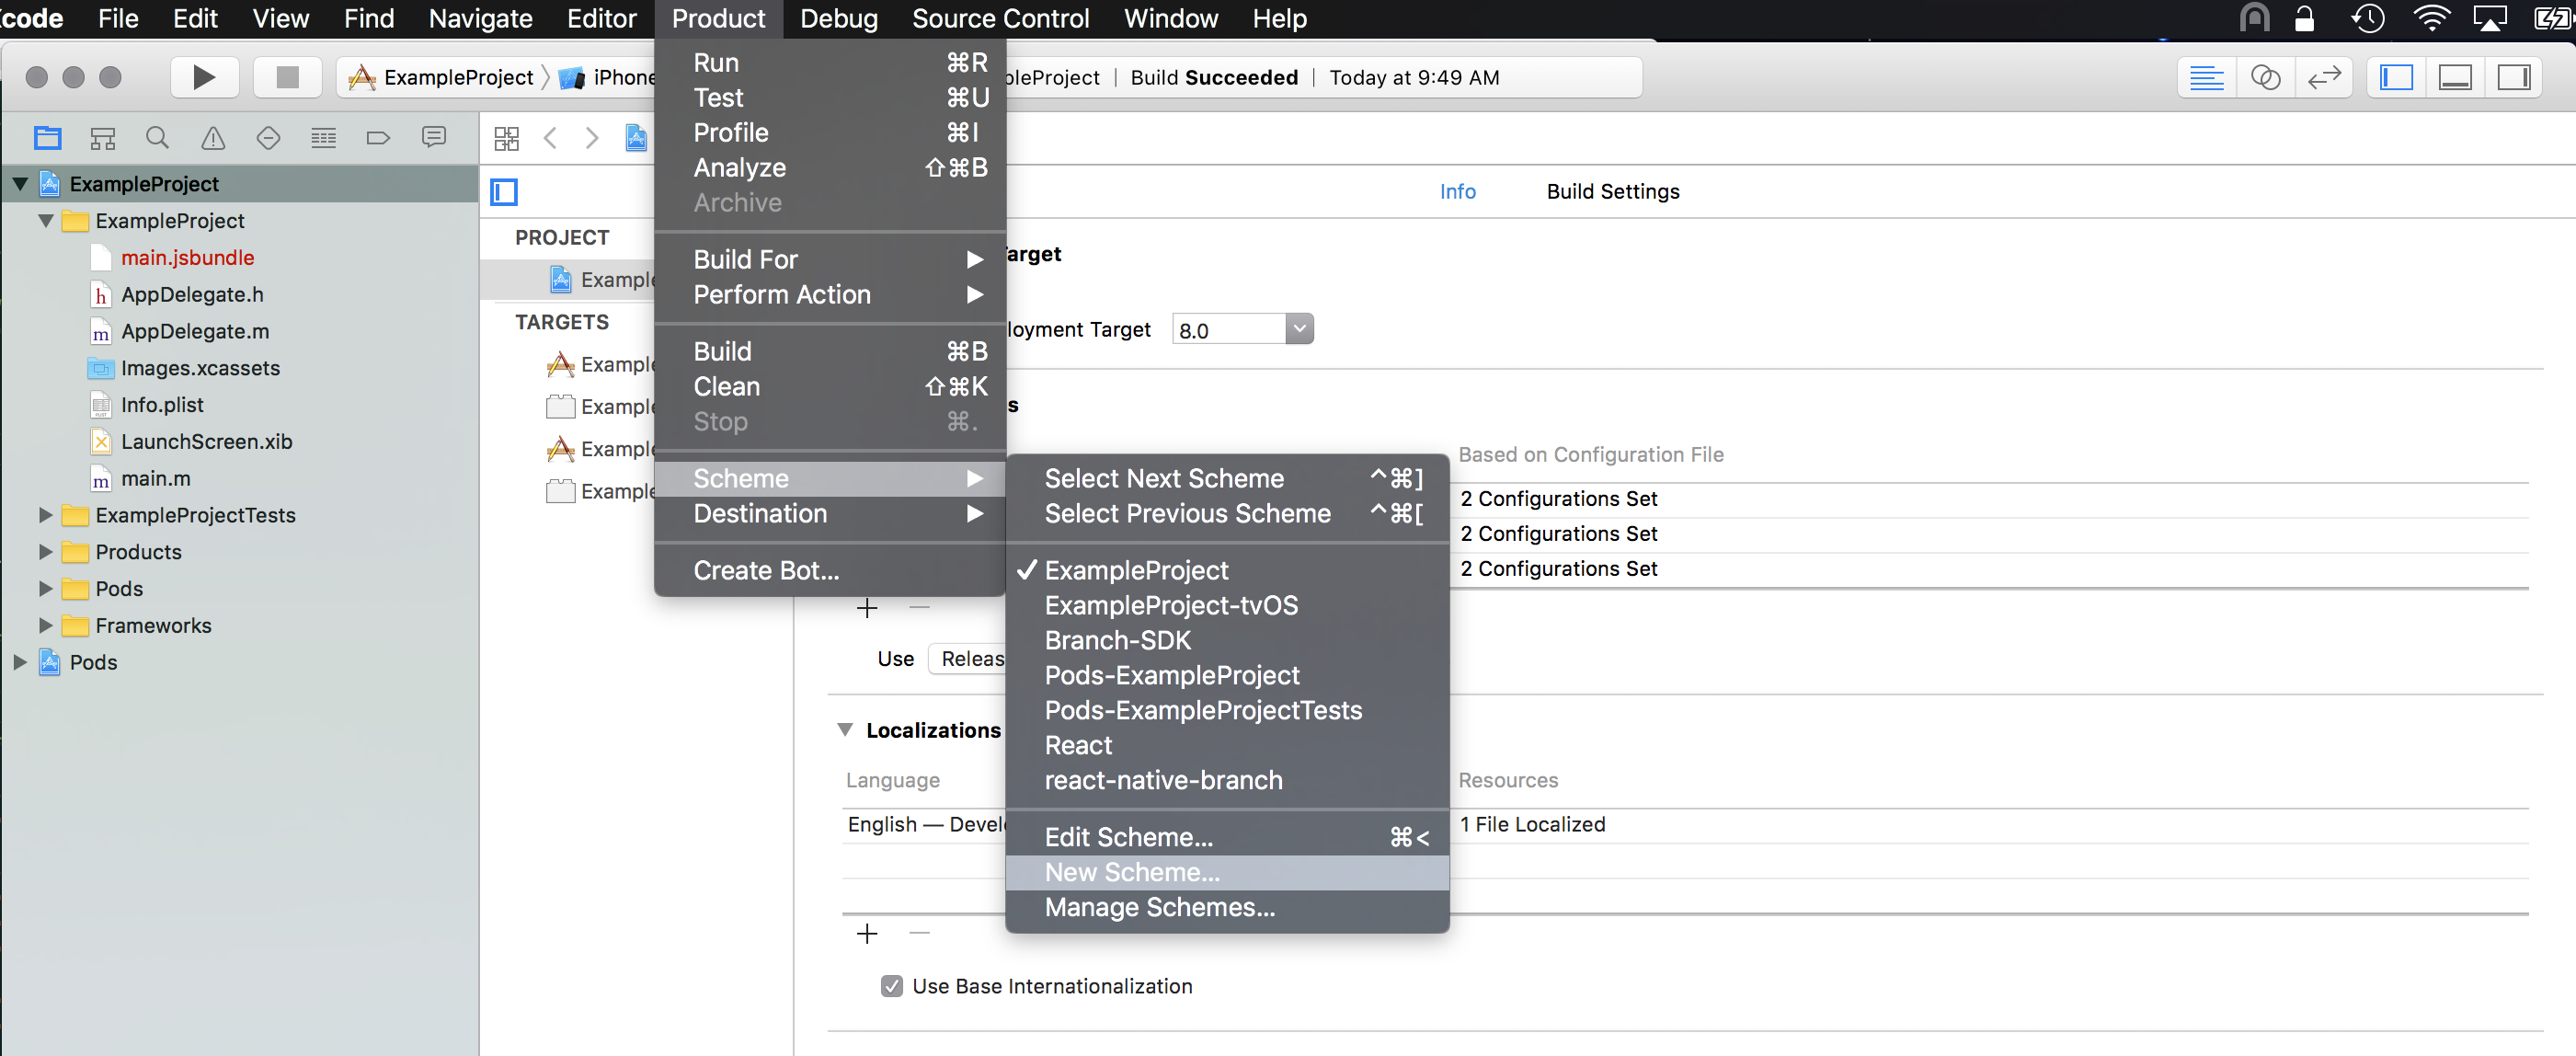
Add -Test to the end of the scheme name. If your app is named MyApp, the default scheme name will be MyApp. Change it to MyApp-Test.

Notice that the scheme pulldown at the upper left of Xcode has changed to show your new scheme.
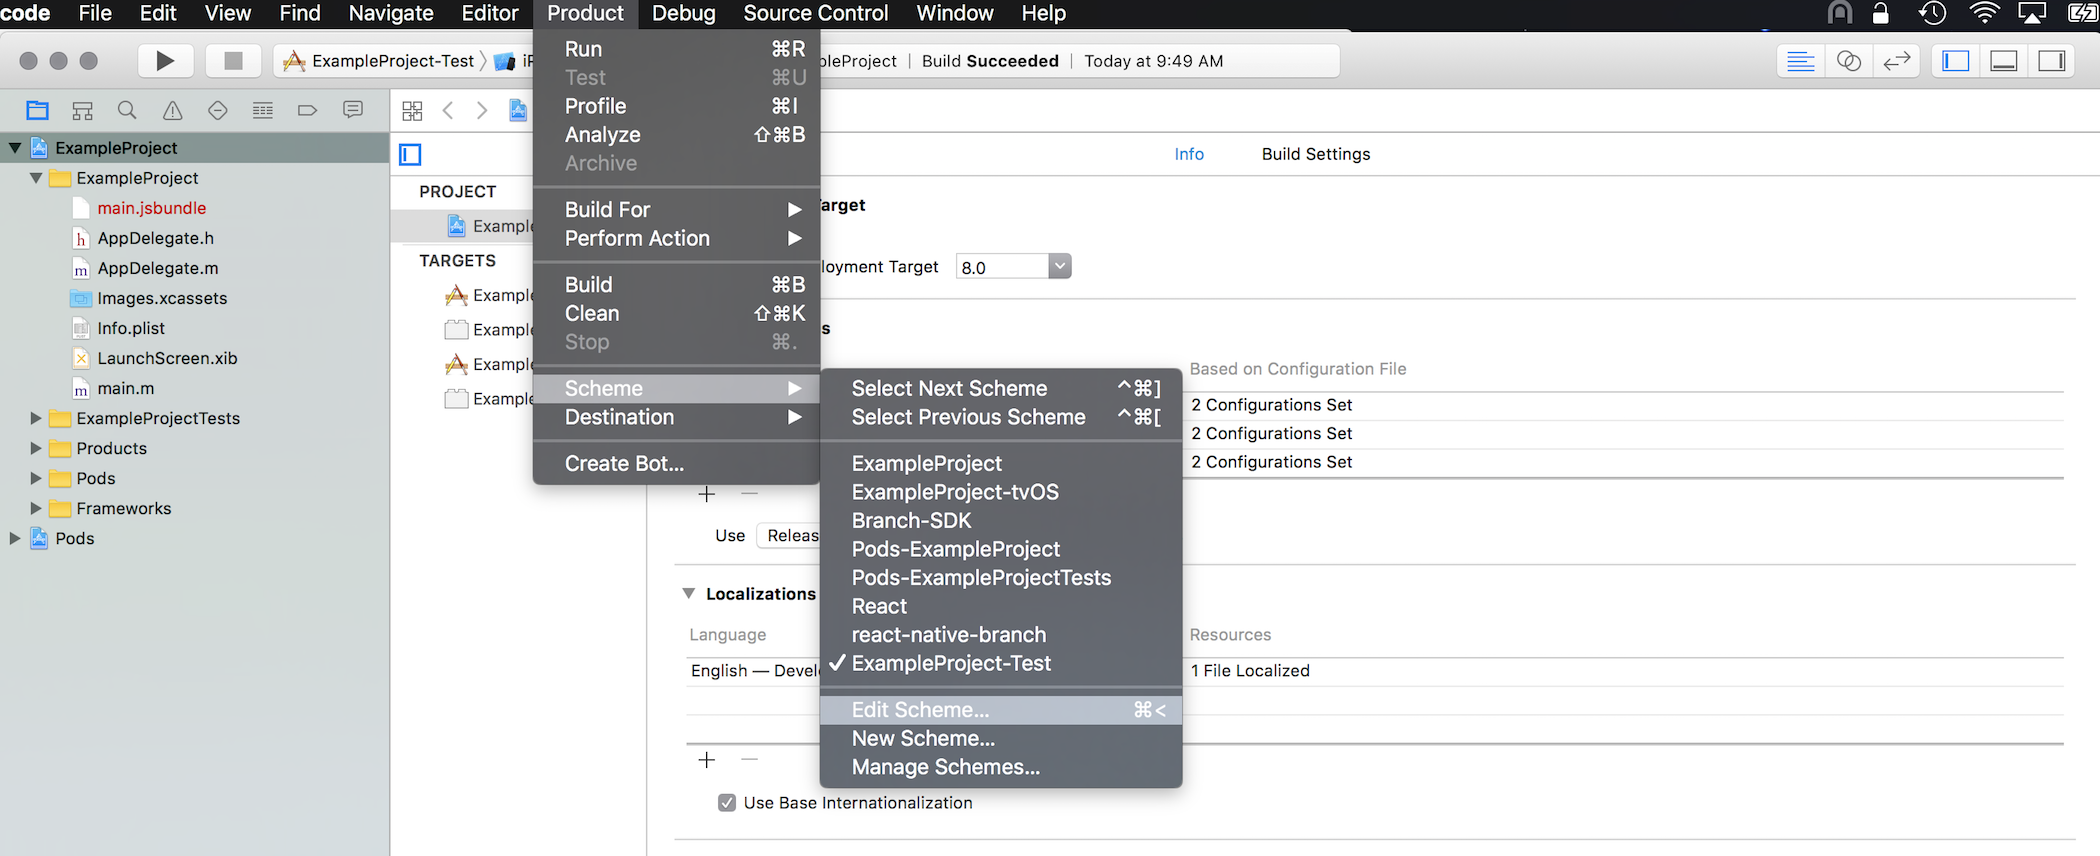
From the Xcode task bar, select Product > Scheme > Edit Scheme....
Check the box at the bottom of the dialog marked Shared to make this a shared scheme:
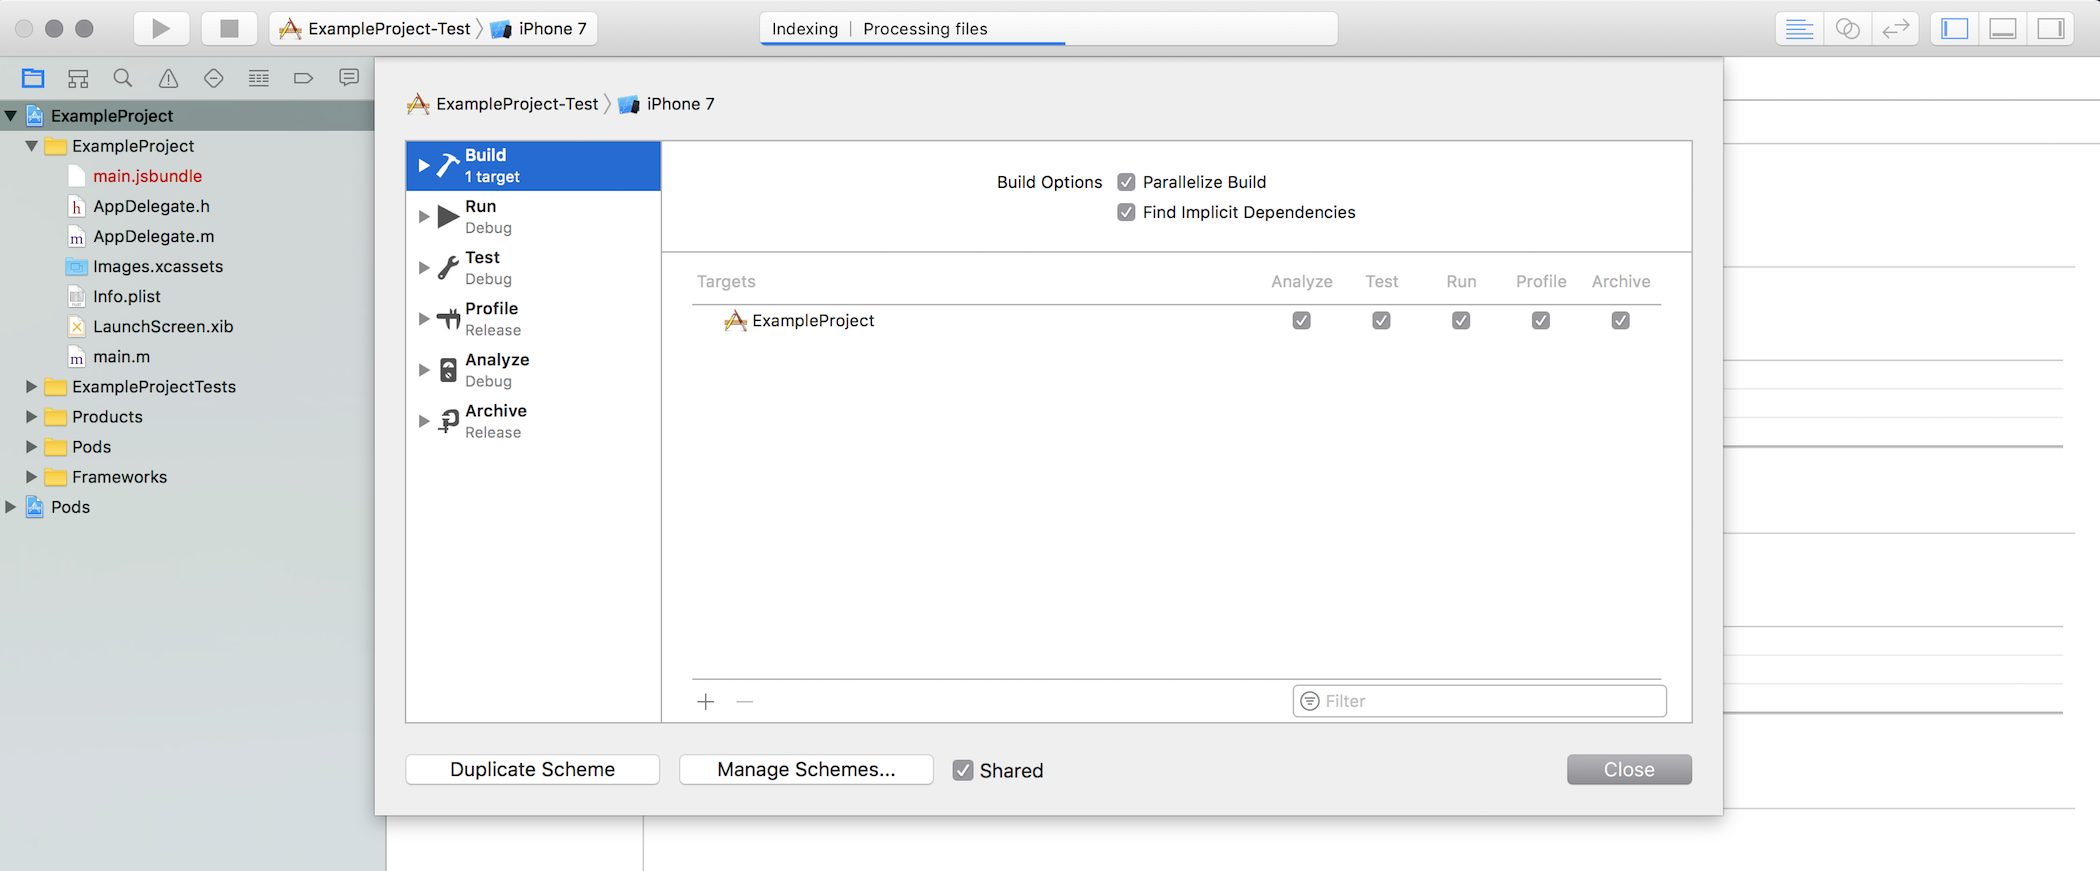
For each task listed in the sidebar of the dialog that currently uses the Debug configuration (Run, Test, Analyze), select the new Test-Debug configuration instead.
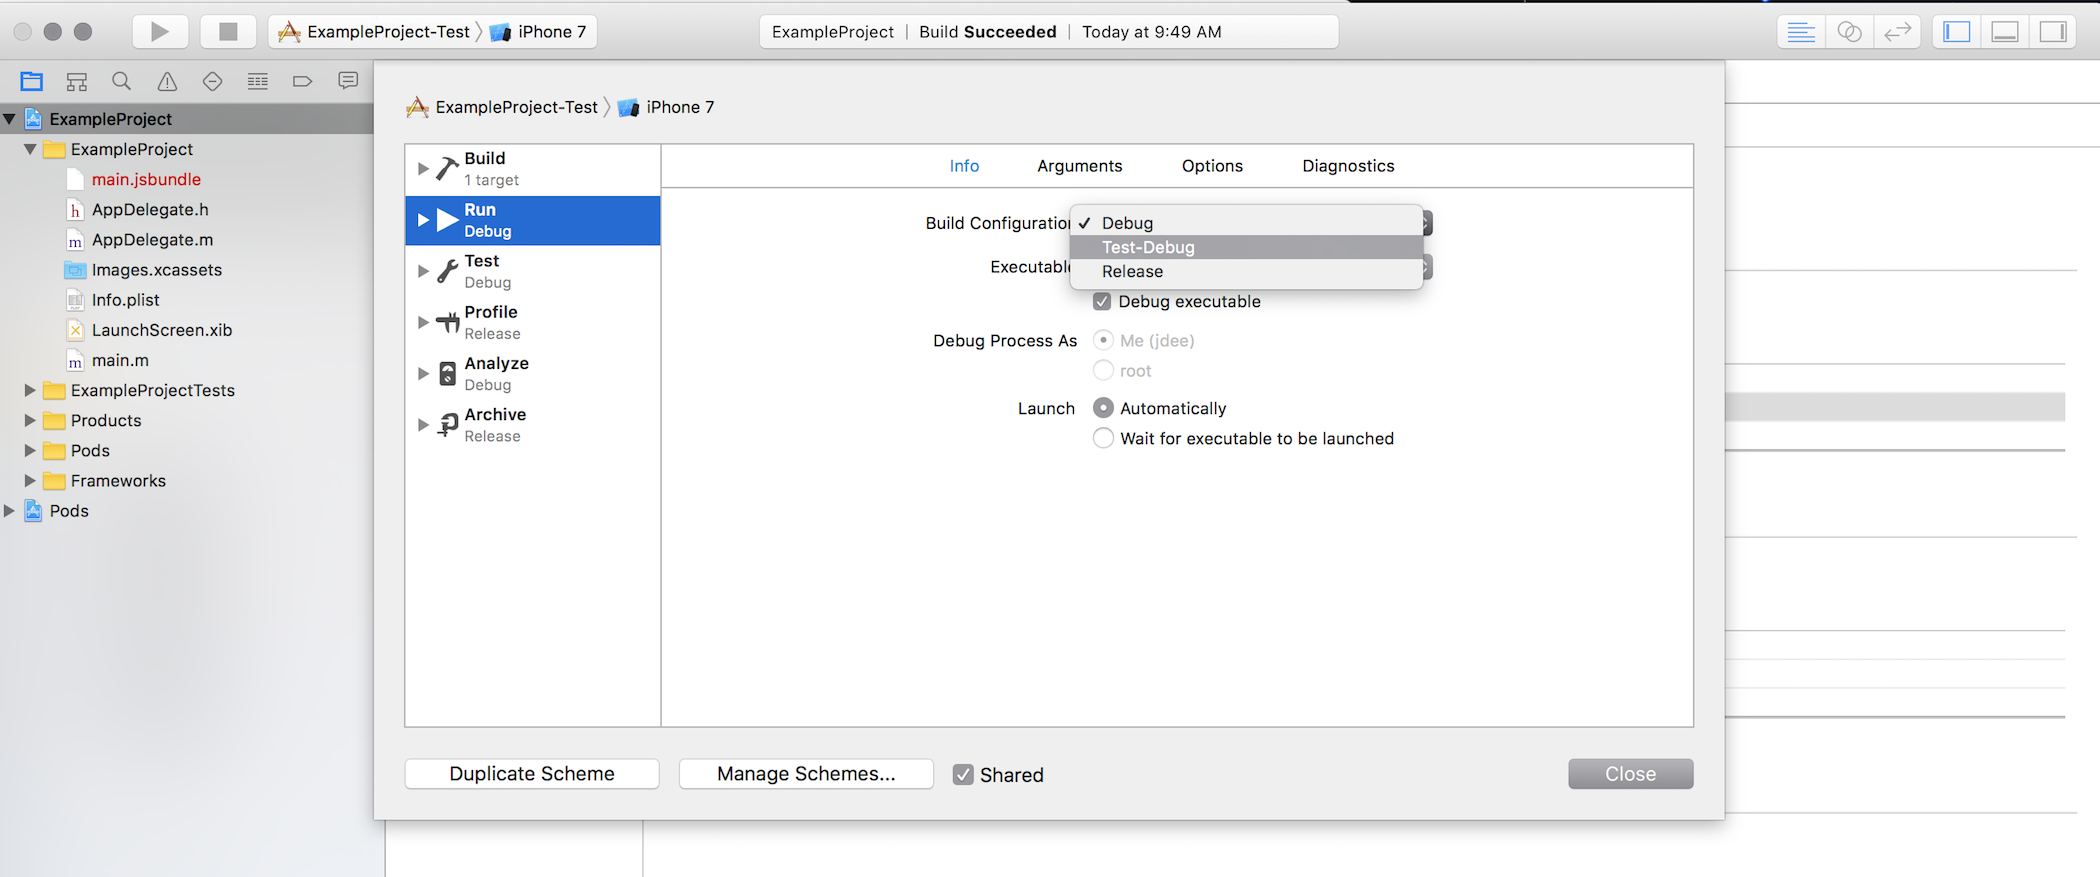
Once this is complete, click Close to dismiss the scheme dialog.
Go to the Build Settings tab in the Project settings. Note that all settings can now be configured separately for the new Test-Debug configuration. It is currently configured the same as the Debug configuration.
Under Apple LLVM 8.1 - Preprocessing, find the Preprocessor Macros setting. Double-click the value for Test-Debug, which should be bold and show DEBUG=1. This brings up a dialog. Click the + button at the bottom of the dialog to add a new macro. Type in USE_BRANCH_TEST_INSTANCE=1.
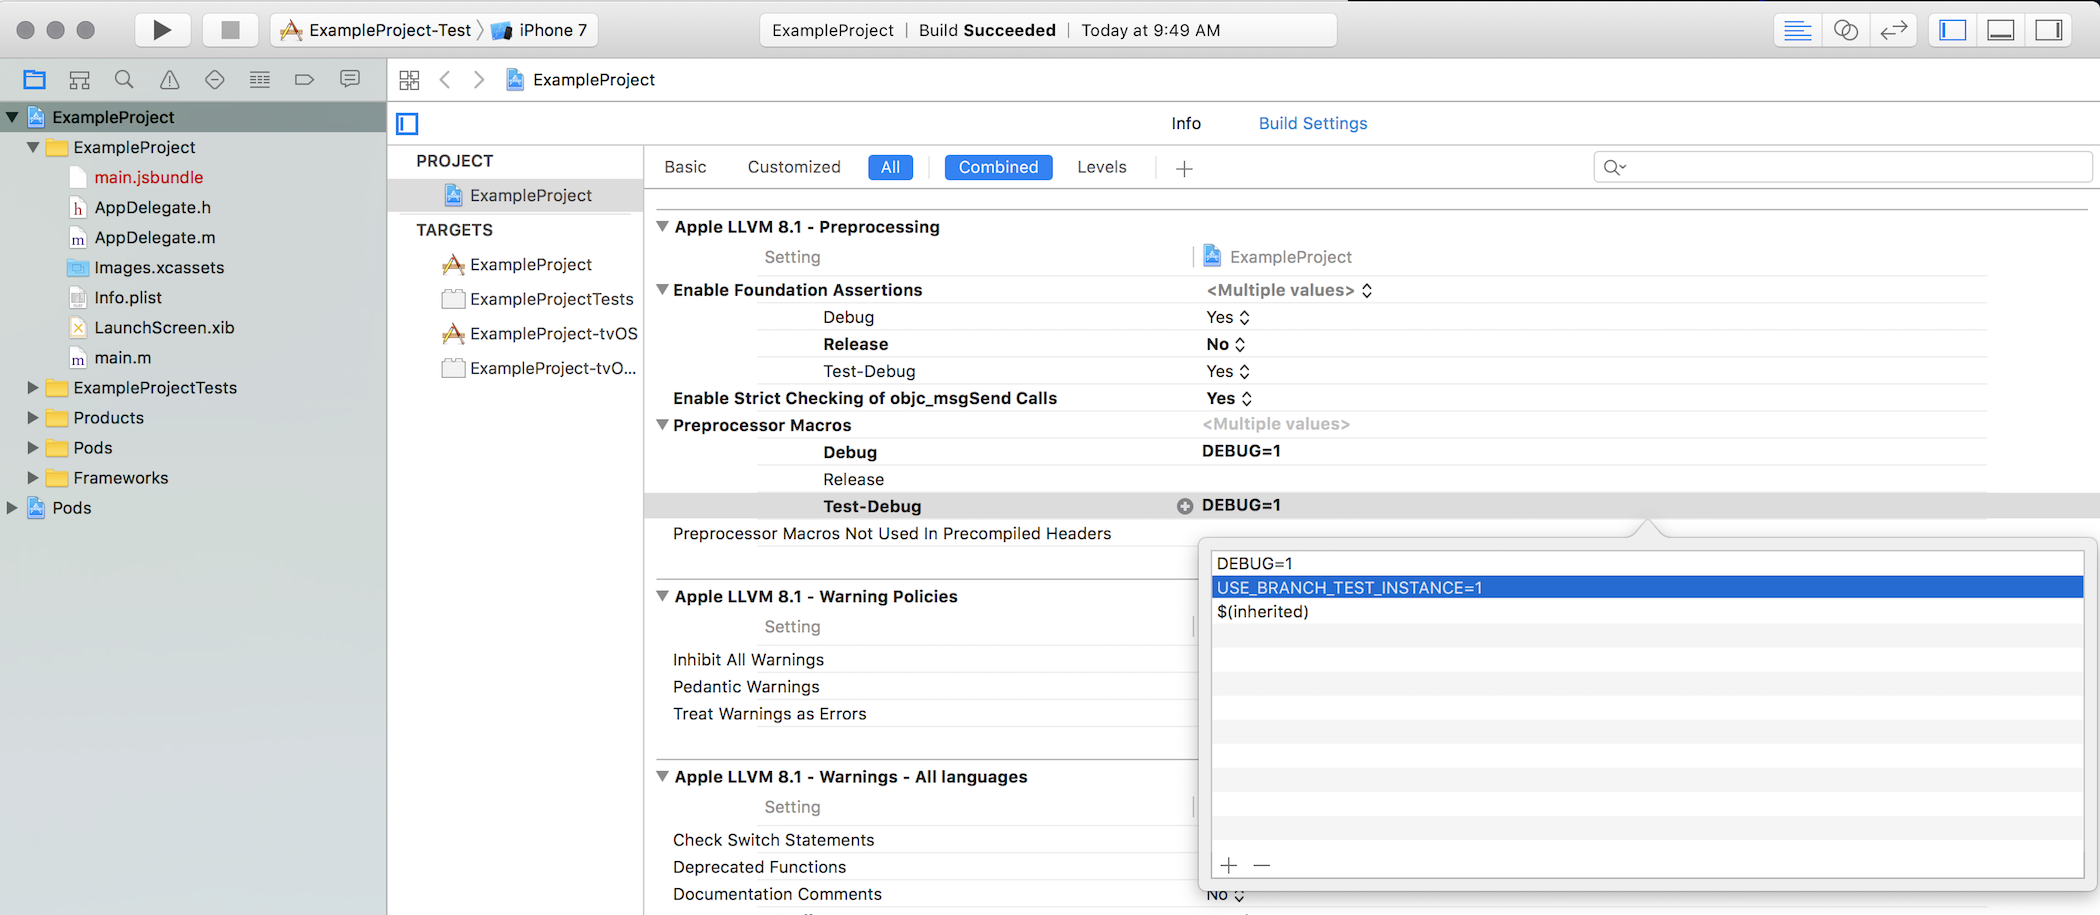
Click outside the dialog to exit. The value of the setting for Test-Debug should now read DEBUG=1 USE_BRANCH_TEST_INSTANCE=1.

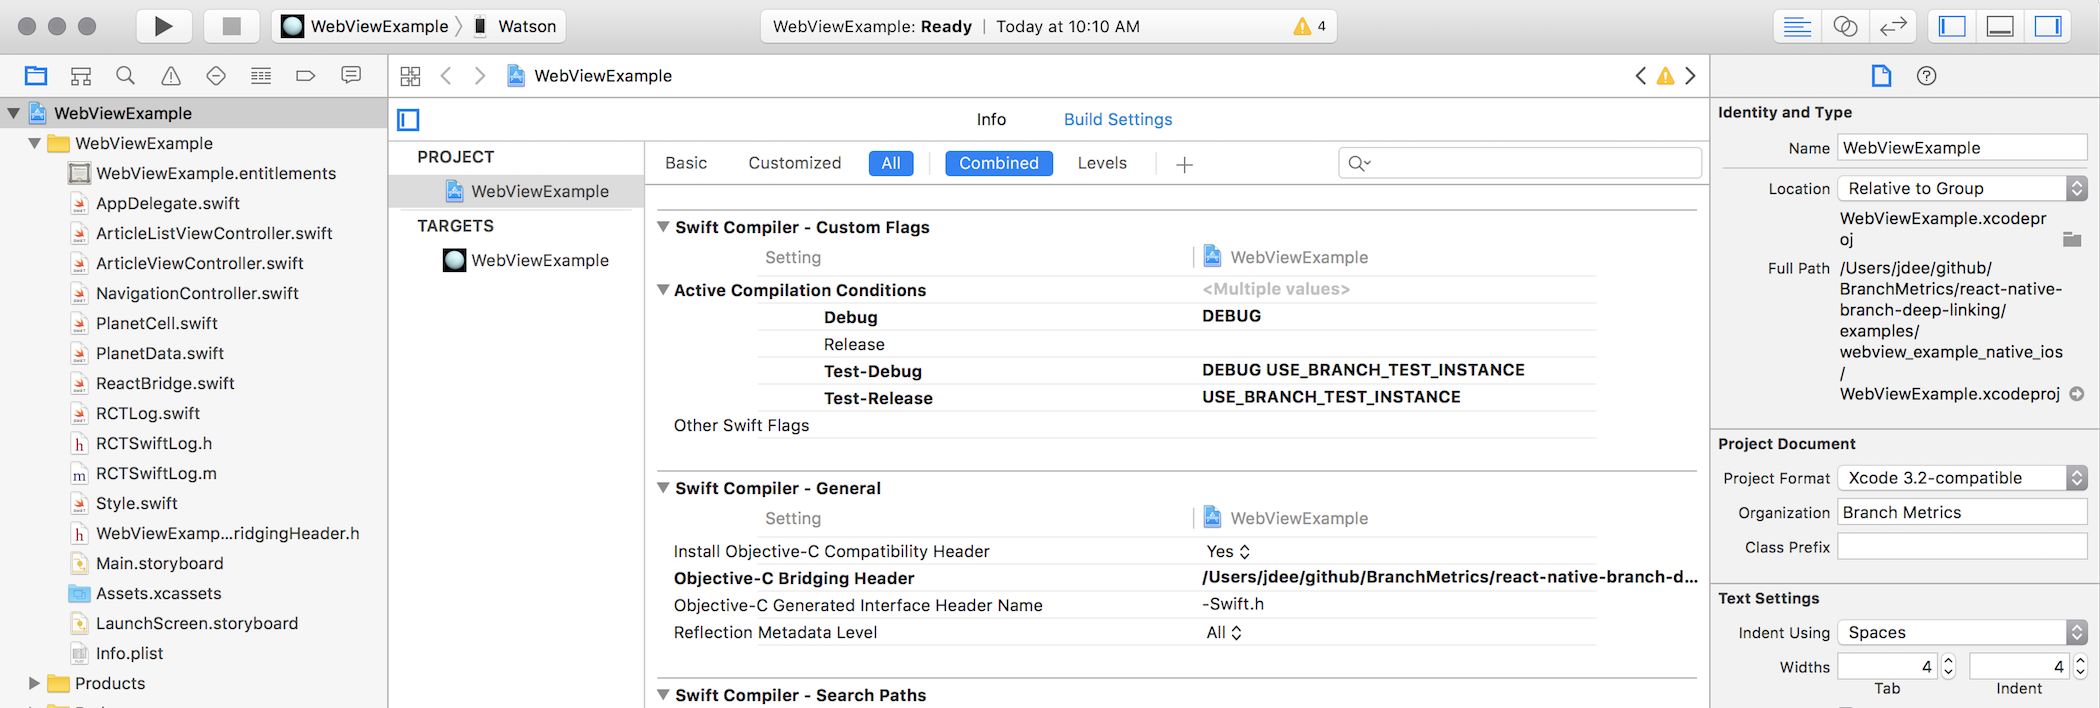
If you are also using Swift in your app, add a similar setting under Swift-Compiler - Custom Flags. Under Active Compilation Conditions, add USE_BRANCH_TEST_INSTANCE to the setting for Test-Debug.
In your AppDelegate, before calling initSession, add a conditional call to useTestInstance using the compiler flag you've specified.
Objective-C
#ifdef USE_BRANCH_TEST_INSTANCE
    [RNBranch useTestInstance];
#endif

    [RNBranch initSessionWithLaunchOptions:launchOptions isReferrable:YES];
Swift
#if USE_BRANCH_TEST_INSTANCE
    RNBranch.useTestInstance()
#endif

RNBranch.initSession(launchOptions: launchOptions, isReferrable: true)If you also want to use the same compilation option for release builds (i.e., make release builds that use the Branch test instance), repeat Steps 1, 3 and 4 for the Release configuration:
- Copy the existing
Releaseconfiguration and name itTest-Release. - Use Project > Scheme > Edit Scheme... and assign
Test-Releaseto tasks that currently useRelease: Profile and Archive. - Add
USE_BRANCH_TEST_INSTANCEto the compilation flags for Test-Release as well as Test-Debug. Note: Do not set theDEBUGoption in the Test-Release configuration.
Add your new configurations to your Podfile:
platform :ios, "8.0"

pod "React", path: "../node_modules/react-native"
pod "react-native-branch", path: "../node_modules/react-native-branch"
pod "Branch-SDK", path: "../node_modules/react-native-branch/ios"

target "ExampleProject"
target "ExampleProjectTests"

# Add this line
project "ExampleProject", "Test-Debug" => :debug, "Test-Release" => :release
And now run pod install after modifying the Podfile. This ensures that when you use Test-Debug,
all pods will be built in debug mode. The default is :release, so it's not necessary to specify
the Test-Release configuration, but adding it may make things clearer.
Now whenever you use the new scheme for any task, including debugging and archiving, the Branch test instance will be used. If you use the original scheme, the Branch live instance will be used.
The scheme can also be passed to xcodebuild using the -scheme argument when you build or test, e.g.
xcodebuild -scheme MyApp-Test. This is also true for other build tools like Fastlane's gym and scan
actions.
The webview_example_native_ios and testbed_example_native_ios examples in this repo are both set up exactly as described here, for reference.